Tuesday, November 20, 2012
Double Wedding Ring quilt finally finished being handquilted!
I have finally finished handquilting on my queen sized Double Wedding Ring quilt!! I am so excited. Doing the Snoopy Dance here tonight in my Minnie Mouse flannel jammies! LOL!
I have been handquilting on this quilt since May 2012. Started putting the top together back 3 years prior. It was a love hate relationship with this quilt pattern. Took a class..teacher had a weird method of putting it together and all of the students hated it. Most of them have not finished theirs. Even students that had the class a couple years prior to me. One of those friends I met after I had the class. I bent her arm this past spring to finish hers along with me. We finished putting the tops together while sewing together. Great encouragement helping each other...should have seen our whips. LOL! It was a HUGE accomplishment just to have the tops together. I immediately basted mine and started handquilting it. I knew if I let it sit, it would be that much longer before I got back to it.
I now have to make the binding and put it on. Will be working on that on Friday!! Can't wait to have this one finished. It's for my wonderful husband! He picked out the fabric and has been waiting all this time to see it finished. He too has been prodding me. LOL!

Tuesday, November 6, 2012
TESSELLATING TREE'S
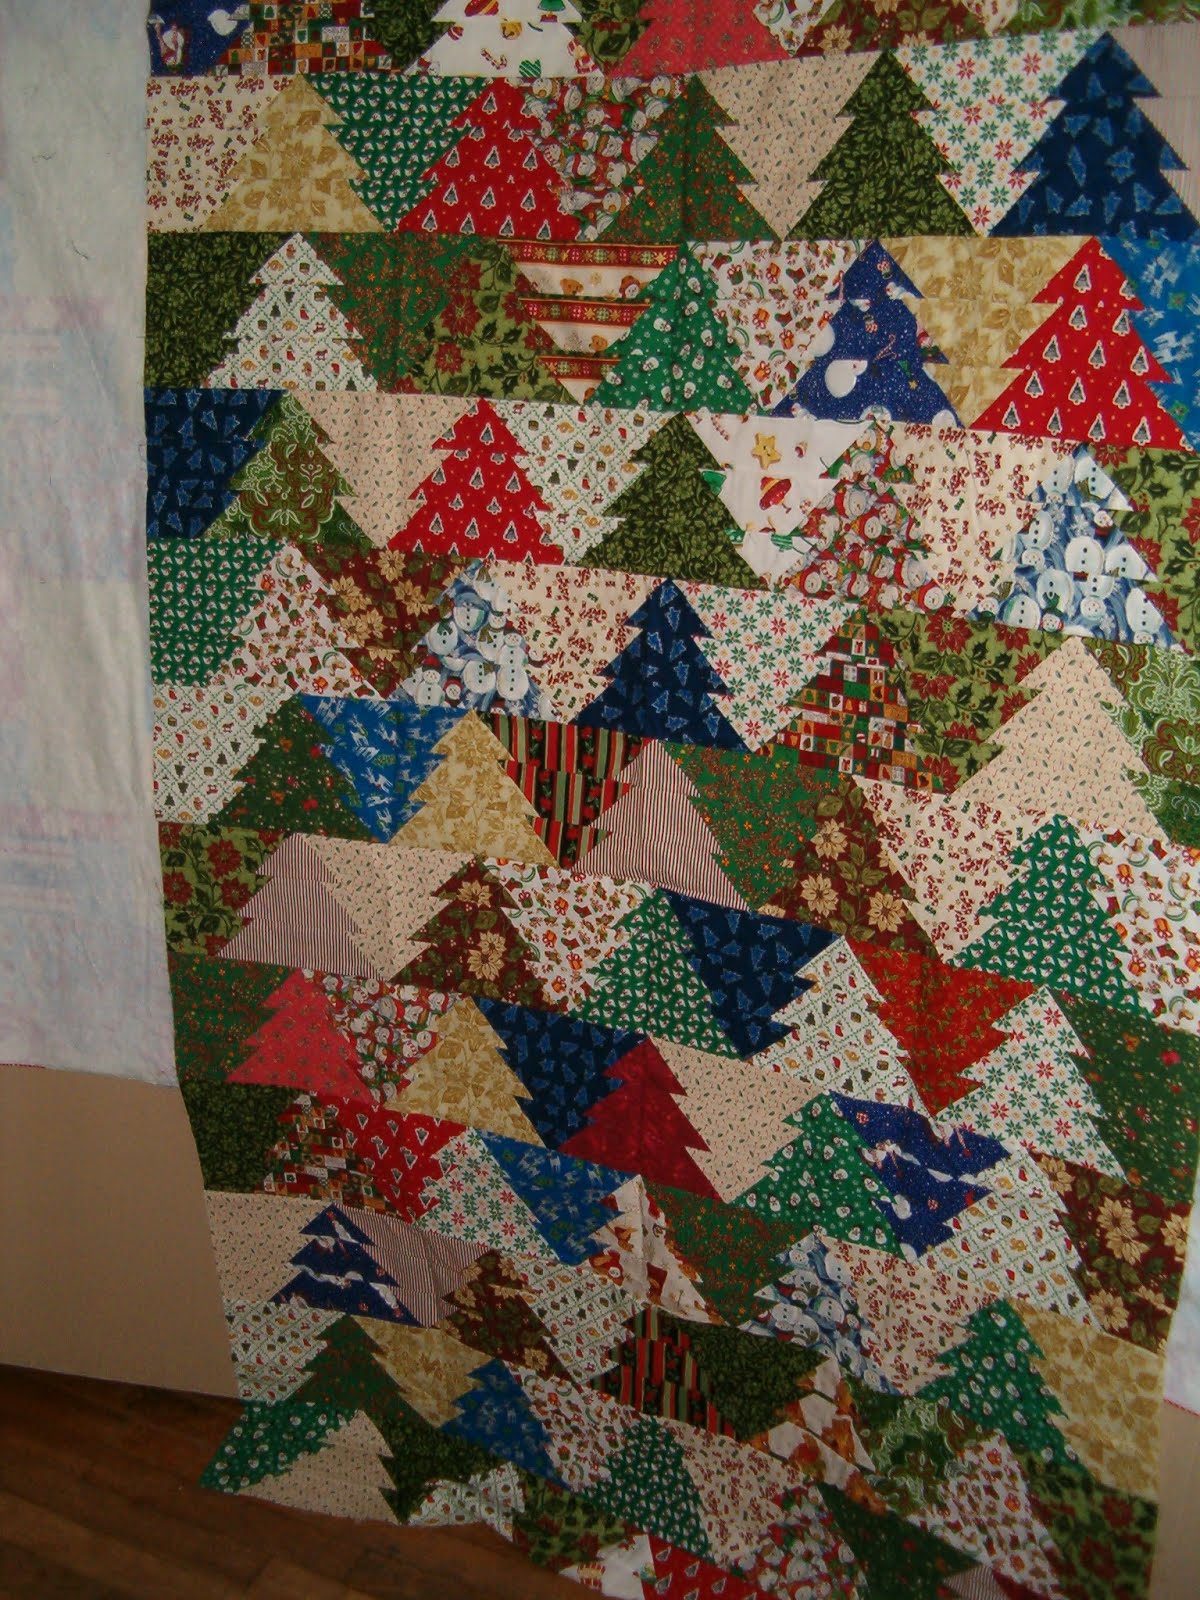
I had a lot of different odds and ends of Christmas fabrics that I needed to do something with. So, I started playing with paper, scissors, and tape. I came up with a tessellating tree pattern.
Then I put the pattern to fabric! You can get one tree out of a 22" length of fabric. I cut my strips to 2 1/2" wide. I don't see why they can't be made in other sizes like 2" wide strips.
Below are pictures of my paper pattern with sizes written on the pieces. Next time, I will make the end tree's 2 inches shorter. I will have to trim that amount off of the sides of the quilt top pictured below.
I plan to put borders on this quilt top. Still debating whether I want to put a narrow border of black, red, or navy..leaning towards black. Have held all 3 up to it and black is winning out with my husband and friends. LOL! I wanted red..shows what I know. Listen to the peanuts in the gallery that you involve..you involved them for a reason now listen to them. LOL!
This pattern also produces waste triangles. So, I sewed them into 1/2 square triangles and then squared them up. I will use them also as a border on this quilt. I have counted my tree's across including the 1/2 tree's on each end and I have 11 tree's across. That's 5 right side up and 4 upside down and 2 halves. I have 12 rows of tree's from top to bottom. I think I am going to remove the bottom row because things are going to get too wonky for me when doing the borders. I do not want an extremely long quilt. I even thought about doing extra borders on the sides than what I do on the top and bottom. Still deciding on that too. So far, this top has been made for a couple of months..decisions of what to do next is the hold up. With the number of tree's I have, that created 30 sets of waste triangles per each row of tree's. In case anyone wanted to know. They are squared up to 1 1/2" half square triangles. I have 360 of them to use on borders!
On my paper pattern you will notice 4 rows to each tree. I only used 3 when making my tree's. I decided to go with 3 so that I could use width of fabric strips of fabric and cut them in half and get two tree's out of one strip instead of one tree out of one strip had I used that extra row. I am trying to use up the scraps not create more.
Here are the pictures:




Thursday, August 2, 2012
One ticked off puppy dog!!
This is Jack the Jack Russell Terrier that owns me. Yep, he owns me and I must do as he wants he thinks. LOL! He is the bestest little dog ever. But, he hates me touching anything other than him and I mean anything and he let's me know about it with sigh's, hacking, begging, and anything he can do to get my hands on him.
He loves blankets and being pampered too. As long as it's all about him, he is a happy camper.
If I lay a quilt top down while in the process of making it, he will jump on it. Does not matter where it is, or how many parts it's in. He insists on being the center of attention. So, when I laid this quilt down on the couch to get it out of the way for just a minute, he promptly jumped up there and gave me the look that you can't get it unless you touch me first! He was mad that day that I had been working on that quilt and not petting him. So, I had to take a picture this time. That's my Irish Mist quilt under it by the way..not finished yet..got to add the last border and then quilt it. It did not turn out as I had hoped..not very happy with it as it is..the quilting will have to save it..more on that after it's all quilted up.


Quilt of Valor
This quilt was a team effort. A fellow stashbuster helped me learn to make fabric postcards a few years back. She also sent me some stuff she no longer wanted to use in the charity quilts I make. The six blocks in this quilt were blocks she sent me. I added the sashing fabrics and backing and put this top together. I met a lady that has a brother that was in Vietnam. He has some serious health issues due to chemical exposure he experienced during his service in Nam. He is wheelchair bound now and has recently had to move to a home that is wheelchair accessible. So, I put this quilt together with him in mind. He lives in Pennsylvania. His sister delivered it to him and he loves it. He can not believe that someone that does not know him made him something so wonderful. He sent me a thank you card too.
It just makes me feel good that it brings a smile to his day..that's all it's about..making someone feel good.
 Also, I tied the quilt for the quilting. That's what the quilt called for when it spoke to me. I bring my ties to the back of the quilt so as not to take away from the front, in case anyone is wondering where the ties are. LOL! I felt that machine quilting would have taken away from those blocks. Love that airplane! Wish I could take credit for putting those blocks together but I did not. Not sure if the lady that passed them on to me made them or not or if she obtained them from a swap or something..she never said.

The Twelve Days of Christmas.
This is all appliqued by machine. I did raw edge with a small, almost satin stitch, zigzag for you that want to know..you know who you are. LOL!
I still have to baste and quilt it. I will bind it in the same red that the red bows are made with. I put the question out to fellow Stashbusters on how it should be quilted. One lady came back with "cross hatching". So, I looked that up on the net and found many classy antique appliqued quilts were quilted in "cross hatching" and it makes them look fantastic. So, "cross hatching" it is! Thank you Jane in Austin!!
This top took two weeks of hard work to get here. Most of the parts are scraps. The only thing I purchased was the backing, sashing, and bows.
 I will be keeping this one.

Blue and White for mom!
This quilt was the 2011 Block of the Month from my local quilt shop. It's called Blueberry Cobbler. I made it for my mom. Finished it in July 2012 just in time for her birthday. This was the first time I made sashing like this. It was a learning experience and not near as hard to do as it looks. There are no "Y" seams, but, there are partial seams that are really easy to sew when sewing attachments in the other directions...you quilters will know what I mean here. That sashing has scared off a lot from completing this quilt. If they would just sit down and do it, they would see it really isn't that hard. Just had to lay out all the parts and not move anything until it was all quilted. Had to pick up two to three parts at a time and go to the machine and sew. Then, lay all that back down in place and pick up two or three more parts and go back to the machine. Had to do this to sew the entire top together.
I add details like this to help other quilters by the way for those of you reading this that don't quilt. We quilters for the most part hold hands and help each other with tips and tricks.


I haven't uploaded pictures in a while. It's such a pain to do so, so, I am slow at it. I could be sewing instead of uploading. LOL!
I found this tropical rain forest fabric at my local quilt shop that I fell in love with. I made 4 baby quilt tops out of it. One for my cousins baby Sean. One for my nephew's baby Evelyn. Two for charity.
I backed 3 with this really cute fleece fabric that had jungle animals on it. The 4th I backed with banana fabric that I got at the quilt shop when I found the tropical rain forest fabric. I also made prairie points with the banana's on the one with banana backing.
This is a link(http://www.youtube.com/watch?v=wfCryJwye_c) to the method I used for the continuous prairie points. Do not buy a special glue though, use your Elmer's School Glue that you already own that washes out when the quilt is washed. Lord help us when Elmer's finds out we use their glue all the time for quilting..the price will shoot up on us when they do find out. LOL!


Subscribe to:
Posts (Atom)